标签 develop 下的文章

Salesforce 未锁定包(Salesforce Unlocked Package)是Salesforce最新推广的基于包的开发最佳实践。通过Salesforce CLI,我们可以很方便的制作和部署未锁定包。本文只是简略的将核心步骤展示出来:

  1. 创建一个 SFDX 项目

    sfdx force:project:create -d demo-workspace -n expenser-app -p force-app
  2. 授权Dev Hub环境,该环境必须启用Dev Hub功能和未锁定包和第二代管控包功能

    sfdx auth:web:login -d -a devHub
  3. 创建一个草稿环境(scratch org)并在其中开发包

    sfdx force:org:create -f config/project-scratch-def.json -u scratchOrg1
  4. 保证所有要打包的组件都已经在当前的项目文件夹内
  5. 从 SFDX 项目文件夹,直接创建未锁定包:

    sfdx force:package:create -n "Demo App" -r force-app -t Unlocked -o [email protected]
  6. 检查项目文件夹中的sfdx-project.json文件,CLI 会自动更新项目文件,使其包含上一步创建的包的信息:

    {
    "packageDirectories": [
       {
          "path": "force-app",
          "default": true,
          "package": "Demo App",
          "versionName": "ver 0.1",
          "versionNumber": "0.1.0.NEXT"
       }
    ],
    "namespace": "",
    "sfdcLoginUrl": "https://login.salesforce.com",
    "sourceApiVersion": "50.0",
    "packageAliases": {
       "Expense Manager": "0Hoxxx"
    }
    }
  7. 创建一个包的版本,Salesforce CLI会自动处理包的版本号等

    sfdx force:package:version:create --package "Demo App" -k lushang.me --wait 10
  8. 在另一个创建好的草稿环境中,安装并测试这个版本的包:

    sfdx force:package:install -p "Demo [email protected]" -y testOrg1 -k lushang.me --wait 10 --publishwait 10
  9. 如果上一步骤没问题,则可以发布这个版本的包:

    sfdx force:package:version:promote -p "Demo [email protected]"

参考:

  1. Salesforce DX Developer Guide
  2. Workflow for Unlocked Packages
  3. Release an Unlocked Package

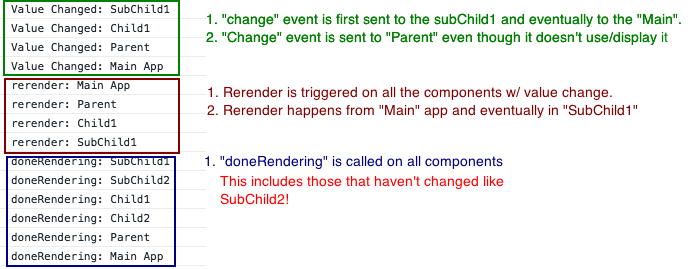
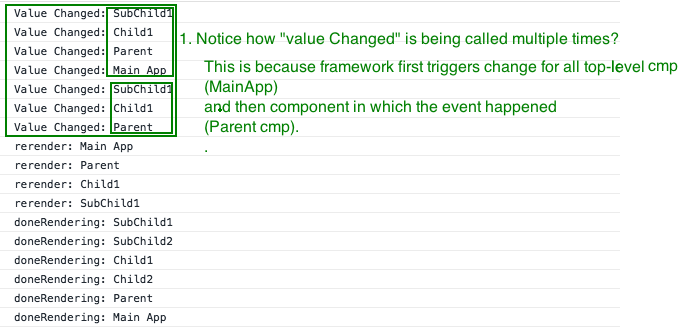
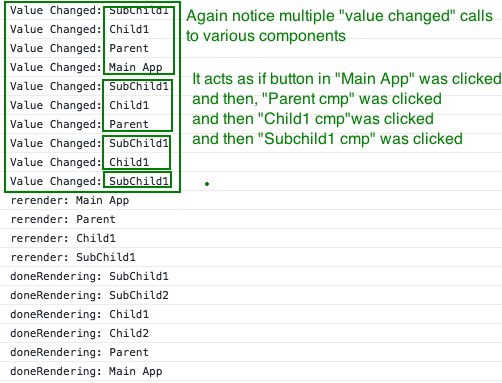
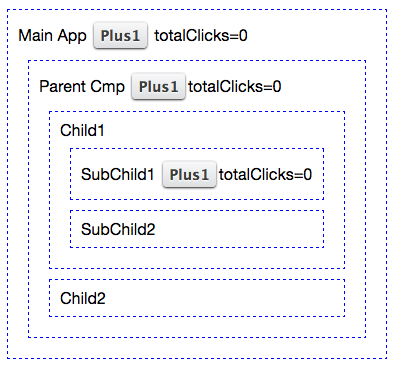
original source: Mutual Fund Explorer: A New Lightning Components Sample Application

Highlight

  • Caching data with storable actions
  • Caching data with a custom cache
  • Creating a dropdown box from picklist values
  • Creating a dropdown box from a list of records
  • Event bubbling
  • Using application events
  • Using component events
  • Using a third-party JavaScript library
  • Using bound vs unbound expressions
  • Building admin-friendly components

Related Github repo: sfdx-dreaminvest

The code is an improvement of this article.

  1. The main visualForce page AddmultipleAccounts code:
<apex:page controller="AddmultipleAccountsController">
<apex:form>
<apex:pageBlock title="Add multiple account" id="main_block">
<apex:pageBlockTable value="{!listAccount}" var="acc">
<apex:column headerValue="Account Name">
    <apex:inputField value="{!acc.Name}"/>
</apex:column>
<apex:column headerValue="Account Type">
    <apex:inputField value="{!acc.Type}"/>
</apex:column>
<apex:column headerValue="Industry">
    <apex:inputField value="{!acc.Industry}"/>
</apex:column>
    <!-- you can add more column here -->
</apex:pageBlockTable>
<apex:pageBlockButtons>
<apex:commandButton value="Add 1 Account Row" action="{!addAccount}" reRender="main_block"/>
<apex:commandButton value="Add 5 Account Rows" action="{!addAccounts}" reRender="main_block" />
<apex:commandButton value="Save Accounts" action="{!saveAccounts}" />
</apex:pageBlockButtons>
</apex:pageBlock>
</apex:form>
</apex:page>
  1. After insert the records, there will be a simple page to show the result, the page AllAccountsSaved will show the result, you can make more work on this page. the code:
<apex:page sidebar="false" showHeader="true">
<center>
    <h3> Congrats your accounts have been successfully saved! </h3>
</center>
</apex:page>
  1. Here the custom controller AddmultipleAccountsController code:

public with sharing class AddmultipleAccountsController {
    public list<Account> listAccount{get;set;}

    public AddmultipleAccountsController() {
        listAccount = new list<Account>();
        listAccount.add(new Account());
    }

    //add one account at a time
    public void addAccount() {
        listAccount.add(new Account());
    }

    //add five account at a time
    public void addAccounts() {
        for(Integer j=0; j < 5; j++) {
        listAccount.add(new Account());
        }
    }

    public PageReference saveAccounts() {
        try {
            insert listAccount;
        } catch(System.DmlException e) {
            for(Integer i=0; i < e.getNumDml(); i++) {
                System.debug(e.getDmlMessage(i));
            }
        }
        return Page.AllAccountsSaved;
    }
}
  1. A test method AddmultipleAccountsControllerTest for the custom controller above, code:
@isTest
private class AddmultipleAccountsControllerTest {

    static testMethod void testAddAccount() {
         Test.startTest();
         AddmultipleAccountsController aacontroller = new AddmultipleAccountsController();
         aacontroller.addAccount();
         list<Account> listAccount = aacontroller.listAccount;
         Test.stopTest();
         system.assert(listAccount.size() == 2);
    }

    static testMethod void testAddAccounts() {
         Test.startTest();
         AddmultipleAccountsController aacontroller = new AddmultipleAccountsController();
         aacontroller.addAccounts();
         list<Account> listAccount = aacontroller.listAccount;
         Test.stopTest();
         system.assert(listAccount.size() == 6);
    }

    static testMethod void testSaveAccounts() {
        Test.startTest();
         AddmultipleAccountsController aacontroller = new AddmultipleAccountsController();
         aacontroller.listAccount[0].Name = 'lushang test account';
         aacontroller.saveAccounts();
         Test.stopTest();
         Account[] acc = [SELECT id,name from Account where name = 'lushang test account'];
         system.assert(acc.size() == 1);
    }
}
  1. Create a visualForce Tab for the page, the user can use this tab to add multiple records.
  • You can change the tab permission settings in certain profile's "Object Settings"
  • You can translate the tab name in the Translation Workbench's translate bar, section is : "Web Tab"
This article if from developer.salesforce.com and you can see the source here
  1. Loads the original record from the database or initializes the record for an upsert statement.
  2. Loads the new record field values from the request and overwrites the old values.
    If the request came from a standard UI edit page, Salesforce runs system validation to check the record for:

    • Compliance with layout-specific rules
    • Required values at the layout level and field-definition level
    • Valid field formats
    • Maximum field length

    When the request comes from other sources, such as an Apex application or a SOAP API call, Salesforce validates only the foreign keys. Prior to executing a trigger, Salesforce verifies that any custom foreign keys do not refer to the object itself.
    Salesforce runs user-defined validation rules if multiline items were created, such as quote line items and opportunity line items.

  3. Executes all before triggers.
  4. Runs most system validation steps again, such as verifying that all required fields have a non-null value, and runs any user-defined validation rules. The only system validation that Salesforce doesn't run a second time (when the request comes from a standard UI edit page) is the enforcement of layout-specific rules.
  5. Executes duplicate rules. If the duplicate rule identifies the record as a duplicate and uses the block action, the record is not saved and no further steps, such as after triggers and workflow rules, are taken.
  6. Saves the record to the database, but doesn't commit yet.
  7. Executes all after triggers.
  8. Executes assignment rules.
  9. Executes auto-response rules.
  10. Executes workflow rules.
  11. If there are workflow field updates, updates the record again.
  12. If the record was updated with workflow field updates, fires before update triggers and after update triggers one more time (and only one more time), in addition to standard validations. Custom validation rules, duplicate rules, and escalation rules are not run again.
  13. Executes processes.
    If there are workflow flow triggers, executes the flows.
    The Process Builder has superseded flow trigger workflow actions, formerly available in a pilot program. Organizations that are using flow trigger workflow actions can continue to create and edit them, but flow trigger workflow actions aren’t available for new organizations.
  14. Executes escalation rules.
  15. Executes entitlement rules.
  16. If the record contains a roll-up summary field or is part of a cross-object workflow, performs calculations and updates the roll-up summary field in the parent record. Parent record goes through save procedure.
  17. If the parent record is updated, and a grandparent record contains a roll-up summary field or is part of a cross-object workflow, performs calculations and updates the roll-up summary field in the grandparent record. Grandparent record goes through save procedure.
  18. Executes Criteria Based Sharing evaluation.
  19. Commits all DML operations to the database.
  20. Executes post-commit logic, such as sending email.