分类 Coding 下的文章

Salesforce Advice

Reduce class level variables data storage

Don't use class level variables to store a large amounts of data.

User SOQL for Loops

Utilize SOQL For Loops to iterate and process data from large queries.

for(Conatct ctt : [Select Id,Name,Account.Name FROM Contact]) {
    // do your work
}

Shorten variables lifetime

Construct methods and loops that allow variables to go out of scope as soon as they are no longer needed.

Other Advice

Using Efficient Algorithms

Being the heart of any code, algorithms can make or break the running of your application. A good space-efficient algorithm can save a lot of your heap memory while simultaneously performing smoothly. Before developing any logic or writing any code snippet, sit, and think through the algorithms to use and choose the one that serves your purpose and makes use of the heap memory efficiently. Try not to split the parts of your algorithms into different functions; rather try to keep them in line when used only within that code.

Built-in Apex libraries

Try to leverage and make use of the inbuilt Apex libraries that Salesforce provides other than writing your custom logic for everything. For example, use the Math class for performing mathematical operations, use JSONGenerator class to create JSON structures, and many more. One line of method calling code is way better than rewriting the logic on your own. This not only saves you time but also the heap memory is managed efficiently.

Avoid using temporary variables

Creating temporary variables is a favorite practice of many developers. We unknowingly create such variables in our code without realizing that we can do without them. These variables take up unnecessary space and add up to the heap memory.

Shorten variable names & declarations

You can spare characters when naming temporary variables like loop counter variables as i instead of myCounter. You should keep meaningful names according to the business.
You can also combine variable declarations like:

Integer i = 0, j = 10;

Shorten Field API Name

We all love to give meaningful names to the custom fields in Salesforce objects. Little do we know that a long API name impacts the code heap size. For example, it is counted in SOQL query size, code that references the field, and each time it is accessed. Maximum length of SOQL statements is 100K.

Remove unnecessary debug statements

Since all the debug statements are counted against the code length, it is necessary to keep a cap on them in order to limit the consumed heap size of the Apex code. It is fine to use them while doing the apex development but should be removed or minimized in the final production version of the code.

Reference

特殊字符供复制拷贝

分类字符用途
数字上标⁰ ¹ ² ³ ⁴ ⁵ ⁶ ⁷ ⁸ ⁹ ⁺ ⁻ ⁼ ⁽ ⁾ ⁿ ′可组运算符号:3⁵,m³, ²/₃
数字下标₀ ₁ ₂ ₃ ₄ ₅ ₆ ₇ ₈ ₉可组化学符号:O₂,CH₄,H₂S
字母上标大写ᵃ ᵇ ᶜ ᵈ ᵉ ᶠ ᵍ ʰ ⁱ ʲ ᵏ ˡ ᵐ ⁿ ᵒ ᵖ ʳ ˢ ᵗ ᵘ ᵛ ʷ ˣ ʸ ᶻ
字母上标小写ᴬ ᴮ ᴰ ᴱ ᴳ ᴴ ᴵ ᴶ ᵏ ᴸ ᴹ ᴺ ᵖ ᴿ ˢ ᵀ ᵘ ᵛ ᵂ ˣ
数学运算符≤ ≥ ± ∓ × ÷ ∧ ∨ ≃ ≂ ∻ < ≦ ≧ ≨ ≩ ≪ ≫ ≭ ≮ ≯ ≰ ≱ ≲ ≳ ≼ ≻ ≺ ∑ ∑ ⨊
其他⊕⊖⊗⊠¬∩∪∝∞ℵℶℷℸℏℇ∀∁∂℮∃∄∅∆∇⊂⊃⊄∈⊋⊆⊇⊈⊉⊅∉∊∋∌∍∧∨ ⨋∕∖∏∐∜∛∦∬∮∯∫∲∰⨔⨖⨚⨙⨘⨛

比如更改root用户密码:

SET PASSWORD FOR 'root'@'localhost' = PASSWORD('mypass');
FLUSH PRIVILEGES;

以上会更改localhost链接的root用户密码,想要更改所有域的链接的root用户密码,使用:

SET PASSWORD FOR 'root'@'%' = PASSWORD('mypass');
FLUSH PRIVILEGES;

总体步骤

类似把大象关进冰箱分为3步:

  1. 把冰箱门打开
  2. 把大象放到冰箱里
  3. 把冰箱门关上

将物理机迁移至ESXi 7.0虚拟机也需要3步:

  1. VMware vCenter Converter Standalone Client将物理机打包成VMware Workstation兼容的vmdk文件;
  2. 将vmdk文件上传至ESXi系统存储,并通过vmkfstools转换其为ESXi7.0兼容的格式;
  3. 用上一步转换而来的虚拟硬盘文件创建虚拟机。

1 打包物理机

  1. WMware官网下载VMware vCenter Converter Standalone Client,可能需要注册一个账号
  2. 在需要打包的物理机上安装并运行VMware vCenter Converter Standalone Client
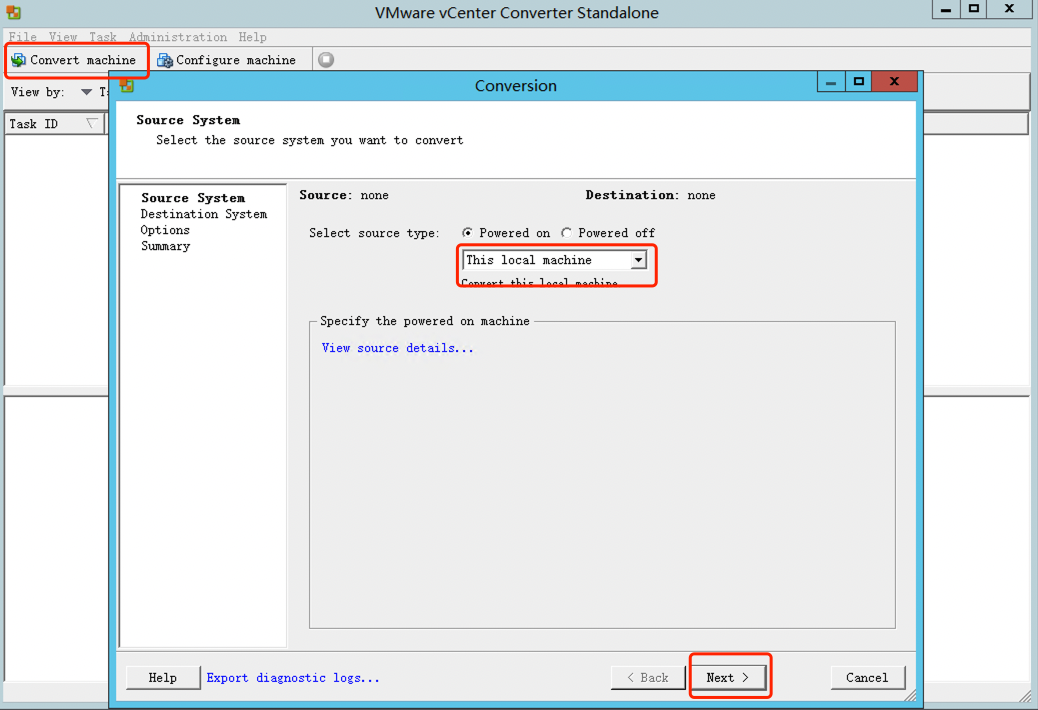
  3. 点击Convert machine,弹窗中选择source typeThis local machine进入下一步:
    WX20220106-103415-1.png
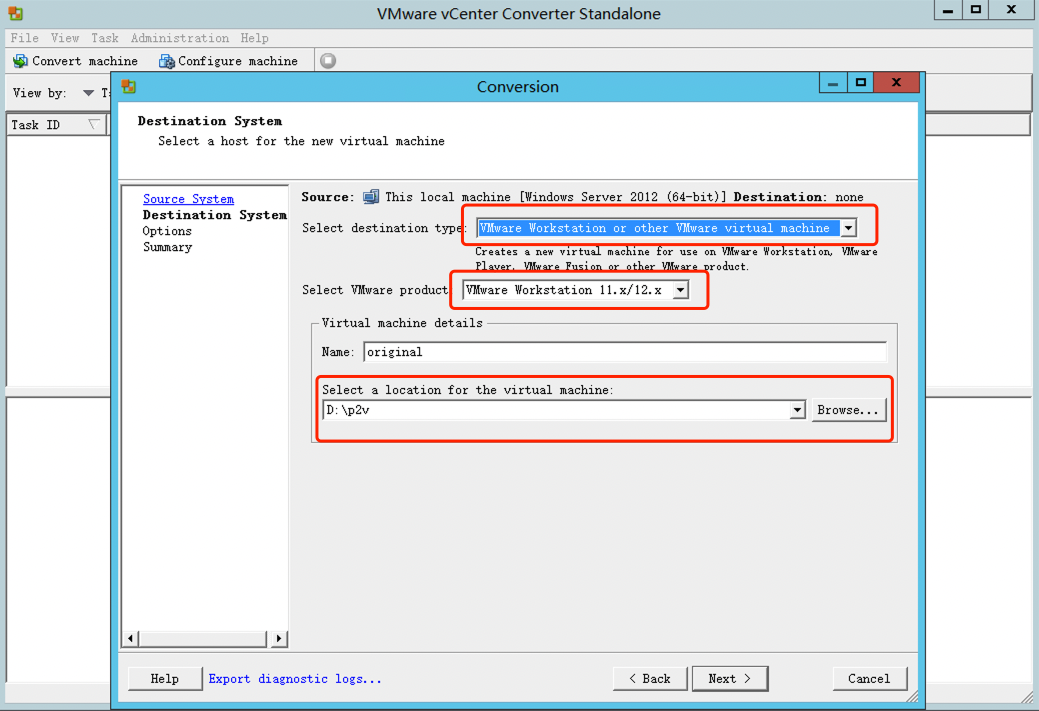
  4. 在目标系统中按照以下界面选择,建议存储位置这里可以通过插入一个移动硬盘并选择这个盘,以方便后续上传到ESXi:
    WX20220106-103534-2.png
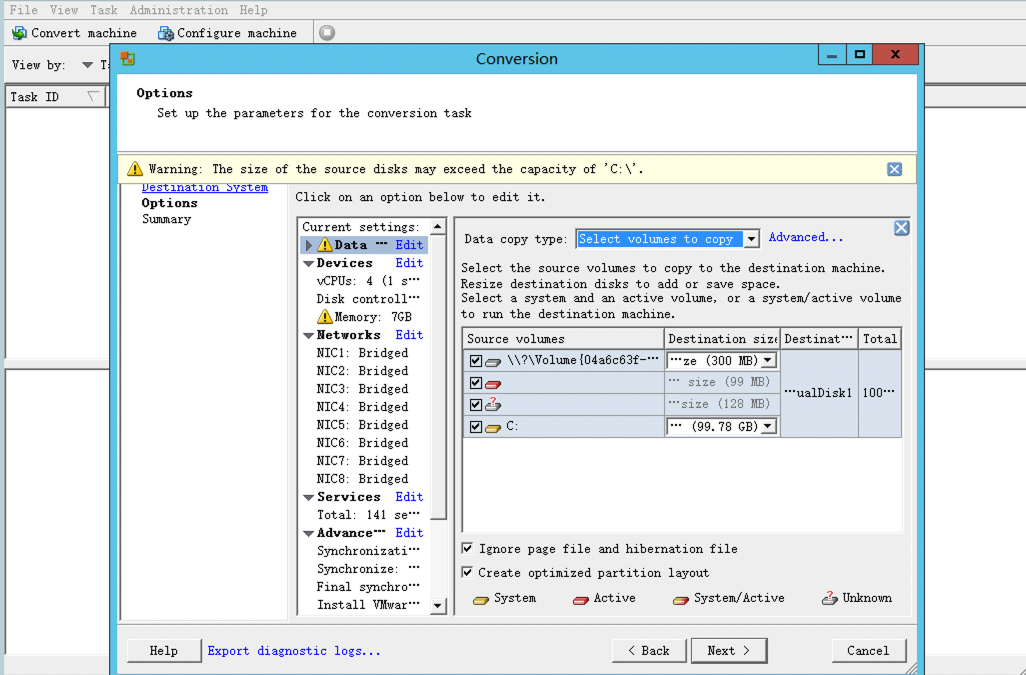
  5. 在选项/Options步骤,编辑Data copy type,只选择需要的打包的分区,比如引导分区、系统盘等
    WX20220106-104151-3.png
  6. 继续点击Next/Finish直到完成转换,稍候片刻,即可获得导出的VMware Workstation兼容的vmdk文件

2 上传vmdk,使用vmkfstools转换格式

由于打包的vmdk是兼容VMware Workstation的版本,是不兼容ESXi的。如果不转换格式的话,会出现类似报错:

无法打开磁盘 scsi0:m: 磁盘类型 n 不受支持或无效。请确保磁盘已导入。
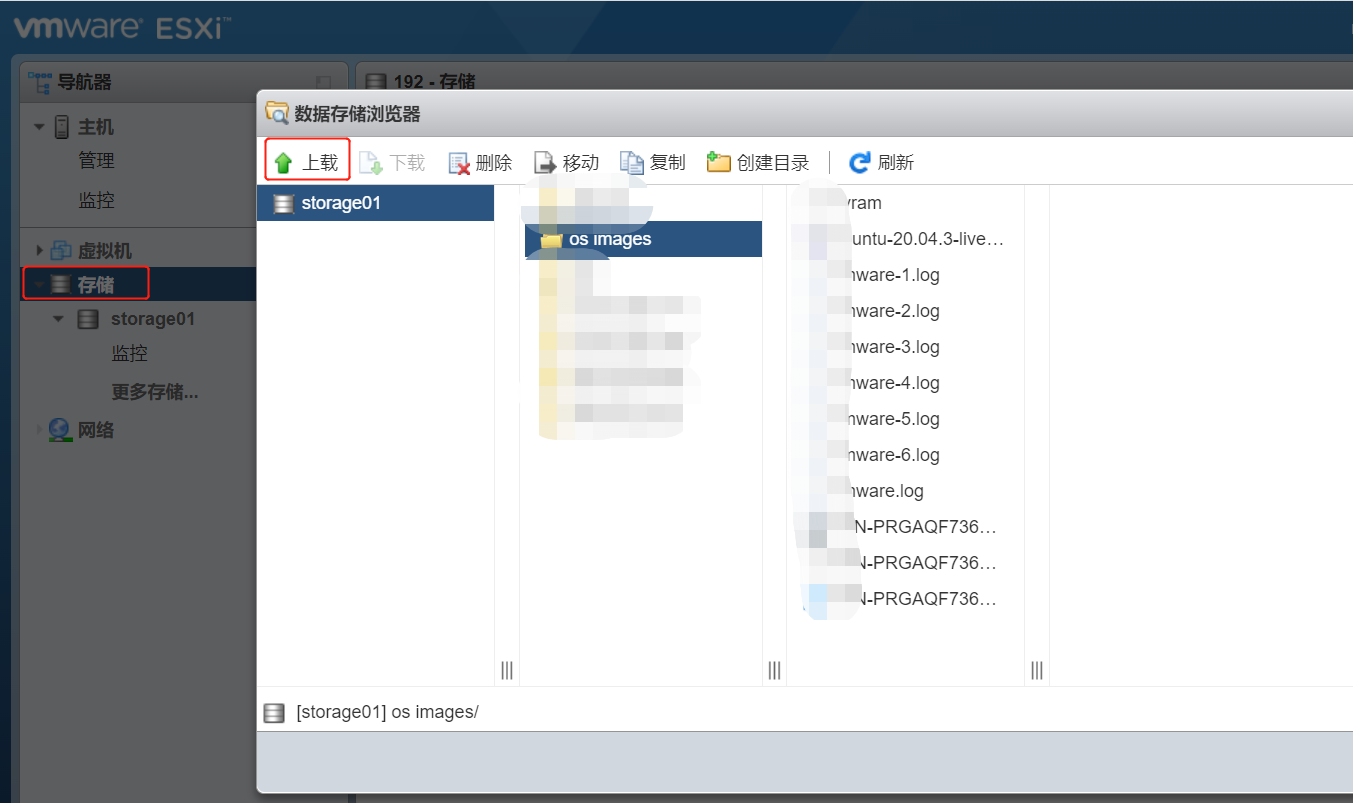
  1. 进入ESXi Web终端,通过存储 -> 数据存储浏览器进入并打开/创建相关文件夹,并上传上一步打包出来的vmdk文件:
    迁移1.png
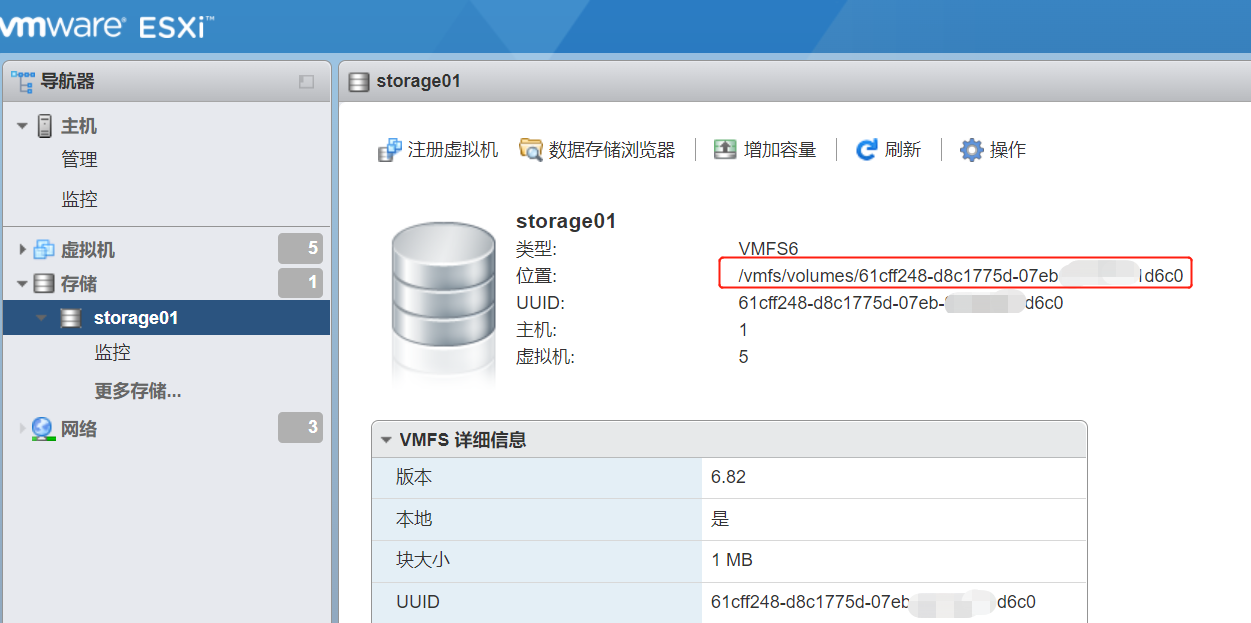
  2. 找到数据存储所在位置:
    迁移2.png
  3. 主机 -> 管理 -> 服务 中打开SSH服务,详见启用对 ESXi Shell 的访问
  4. 通过终端SSH连接到ESXi服务器
  5. cd到第2步存储所在的文件夹,再进一步cd到上传的vmdk文件所在的文件夹
  6. 执行vmkfstools转换格式命令,记得最后要使用-d thin来使用精简置备模式,以节省空间

    # 进入导入vmdk文件所在的文件夹
    cd /vmfs/volumes/xxxxx248-xxxx75d-07eb-xxxxd6c0/xxxx
    # 转换格式,假定原文件名为orginal.vmdk,转换后的文件名为dest.vmdk
    vmkfstools -i orginal.vmdk dest.vmdk -d thin
  7. 等待片刻,即可享用转换出来的vmdk文件

3 创建虚拟机

创建一个新的虚拟机,添加上一步转换出来的vmdk文件为新的硬盘

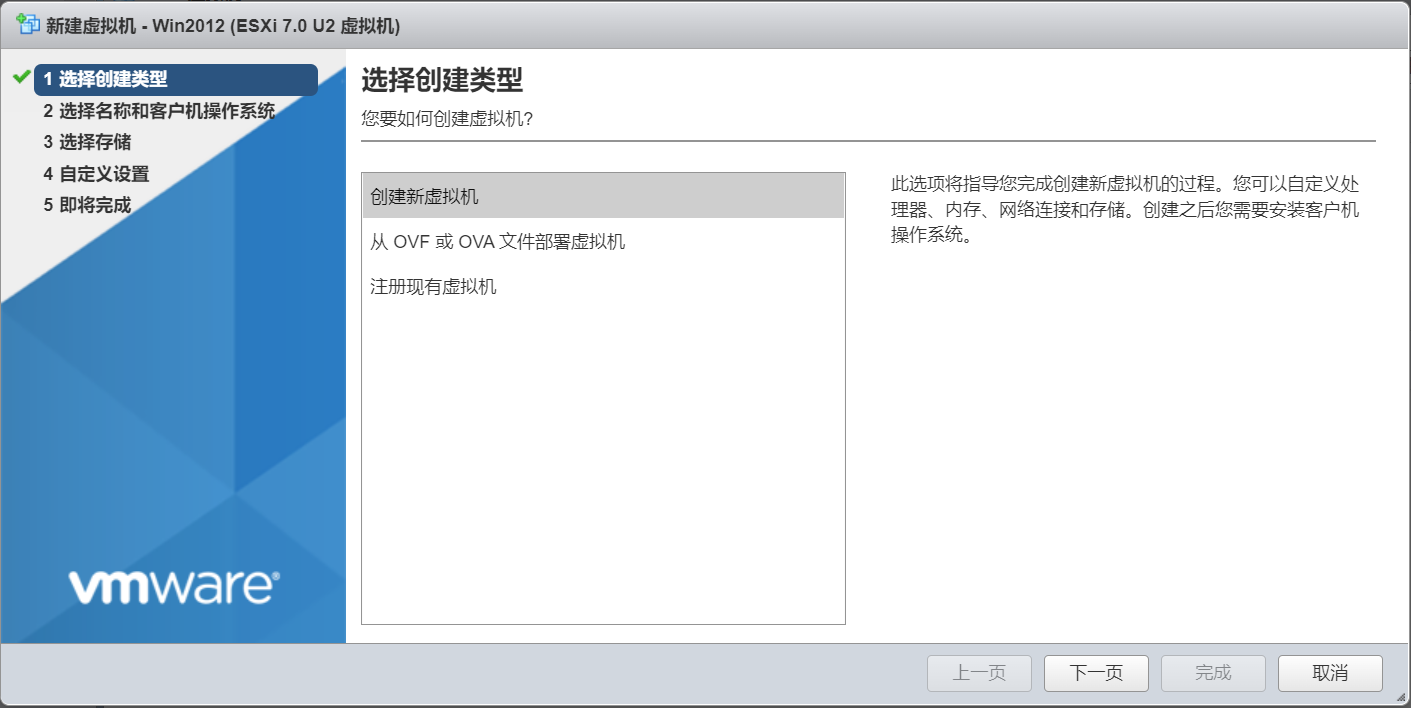
  1. 进入ESXi终端,通过虚拟机 -> 新建虚拟机 -> 创建新虚拟机
    迁移3.png
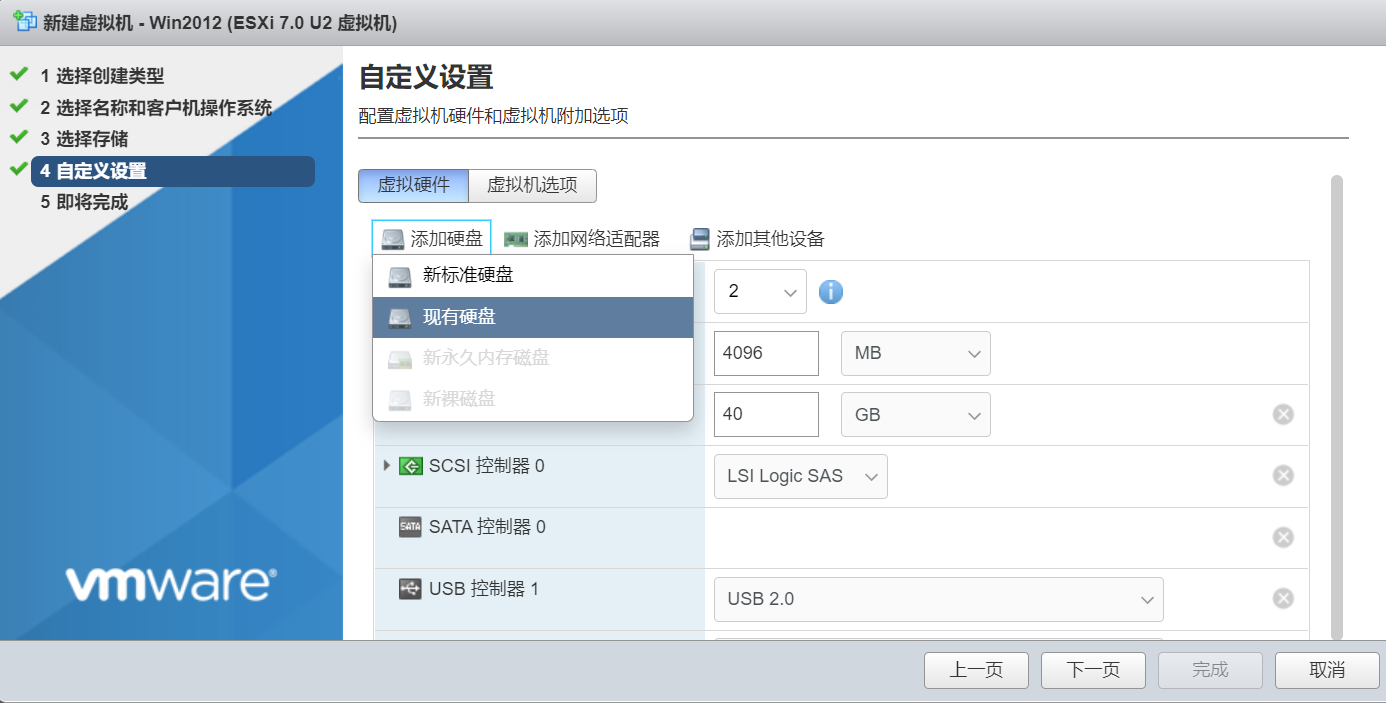
  2. 自定义设置,硬盘选择那里添加一个现有硬盘,选择刚才创建的vmdk文件(dest.vmdk
    迁移4.png
  3. 安装常规步骤创建好虚拟机
  4. 理论上你可以运行你的虚拟机了

参考

LEDE的vmdk在esxi下提示scsi0:0的磁盘类型不受支持或无效_Jian Sun_的博客-程序员宝宝
WorkStation 虚拟机迁移到 ESXi的后续处理. 转载

目录

  1. 安装和配置Jenkins
  2. 构建和发布Docker镜像

安装和配置Jenkins

  1. 准备一个操作系统,并安装Docker,具体可以参考Docker文档

    • 若是Linux操作系统,应增加docker用户组并将当前作业用户添加进组,否则必须使用sudo升权执行

      sudo groupadd docker
      sudo usermod -aG docker ${USER}

      退出登陆或重启系统后即可直接运行docker

  2. 拉取Jenkins相关Docker镜像并运行

    • 拉取并运行blueocean版本的Jenkins镜像:

      docker run -p 8080:8080 -p 50000:50000 -v jenkins_data:/var/jenkins_home jenkinsci/blueocean
    • 为了支持SSH操作,拉取并运行jenkins/ssh-agent镜像:

      cat pub.key | docker run jenkins/ssh-agent

      * pub.key配置相关证书密钥中Jenkins容器的公钥

  3. 配置Jenkins:

    • 浏览器打开Jenkins镜像宿主机IP地址所在8080端口,如:http://localhost:8080
    • 使用上一步启动Jenkins获得的初始密码进入系统并创建用户
    • 进入Manage Jenkins -> Manage Plugins添加Maven Integration pluginGitLab PluginSSH pluginDocker Pipeline这些插件
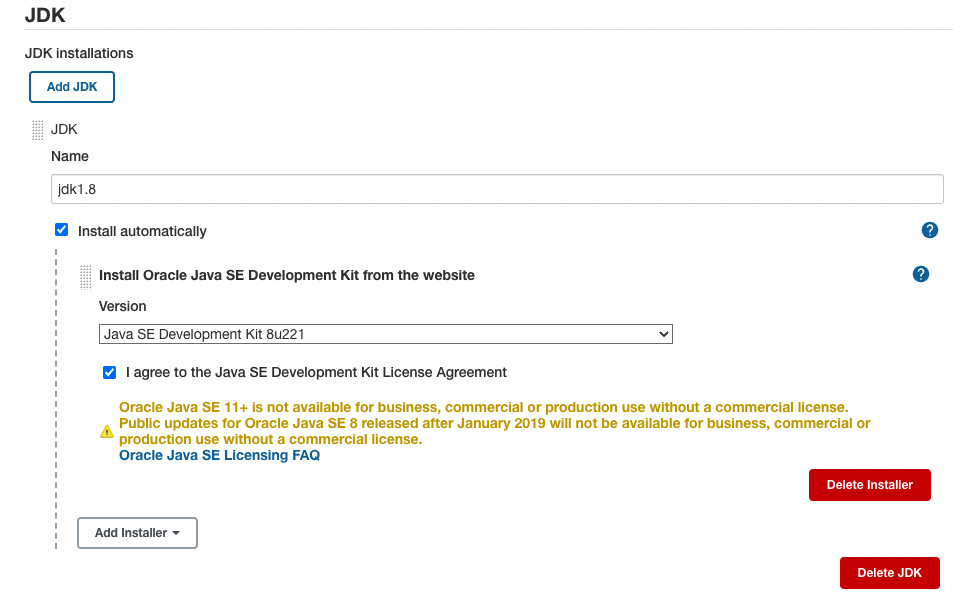
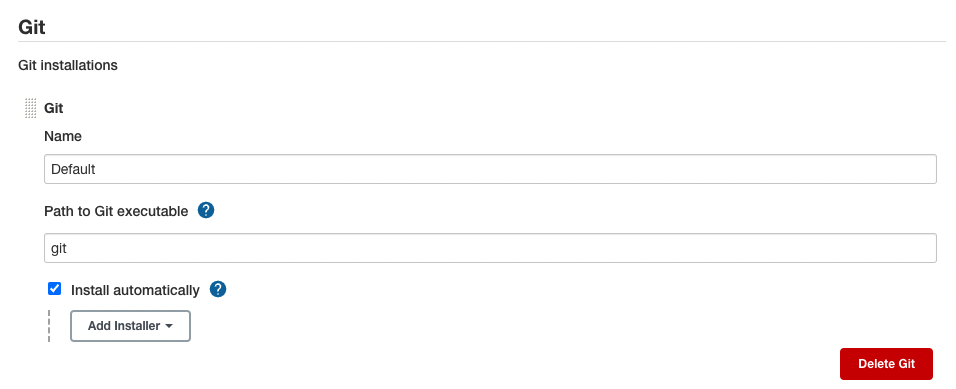
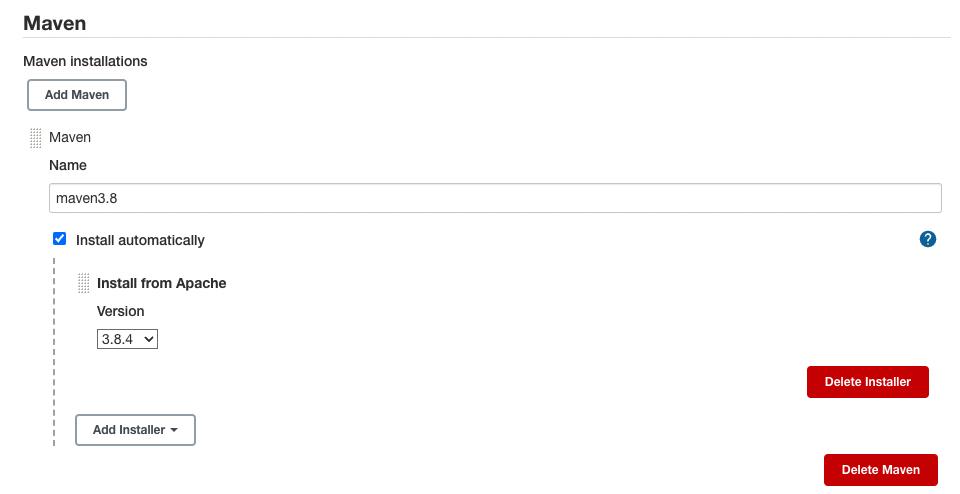
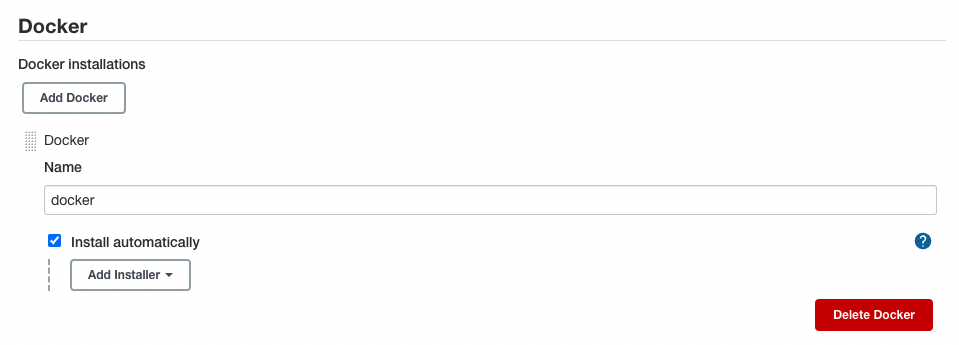
    • 进入Manage Jenkins -> Global Tool Configuration配置JDK、Git、Maven、Docker
      jenkins-jdk.png
      Jenkins- Git.png
      Jenkins- Maven.png
      Jenkins-Docker.png
  4. 配置相关证书密钥和用户名密码,为连接GitHub、Gitlab,Docker私服、远程服务器做准备:

    • 配置Jenkins自身的证书:进入Jenkins所在容器,创建SSH密钥/证书,并添加进Jenkins系统中(用来从Github/Gitlab下载源码)

      # 进入jenkins容器,假设容器ID为abc
      docker exec -it abc /bin/bash
      # 生成证书,默认在/var/jenkins_home/.ssh/下有id_rsa和id_rsa.pub两个密钥和公钥
      ssh-keygen -t rsa
    • 将公钥作为Deploy Key添加进对应的Github或者Gitlab项目中
    • Manage Jenkins -> Credentials中添加此密钥(Jenkins自身密钥)
    • 继续添加Docker私服的用户名密码
    • 继续添加远程服务器SSH登陆的用户名密码
  5. 创建Jenkins构建脚本

    • 若是Maven项目,可以选择Maven项目构建;若是纯Docker构建,直接选择Freestyle
    • 配置source为Git,输入repo地址(git@开头),并选择Jenkins自身密钥作为凭证(Credentials)
    • 添加构建步骤,选择Docker构建和发布,输入Dockerfile所在文件夹,若就在根目录则不必输入
    • 选择使用Docker构建,设置镜像名称为Docker私服地址/用户/镜像名,勾选发布镜像,并选择Docker私服的凭证
    • 在触发条件出选择push event,将对应的Webhook填写到GitHub/Gitlab对应项目的Webhook设置中去
  6. 测试构建脚本(略)
  7. 在远程服务器上线
    通过布置一个脚本,进行远程登录+拉取并运行docker镜像,即可实现在远程服务器上上线的操作。

参考

  1. 高效部署Springboot的三种方式,知乎